Side-Stepping Squares
In your first solo using stepping squares, you ran out of strings on the 12th fret of the high E string. Your only option was to turn around and retrace your steps. Now you can jump from one group of stepping squares to another and never run out of strings or squares.
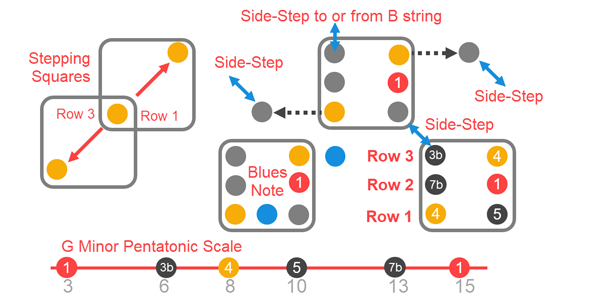
You can side-step from any gray corner note.
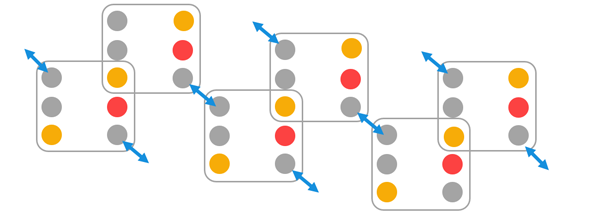
You can't side-step from orange corner notes. But you can move over a narrow interval to the left or right and side-step from the gray corner note.

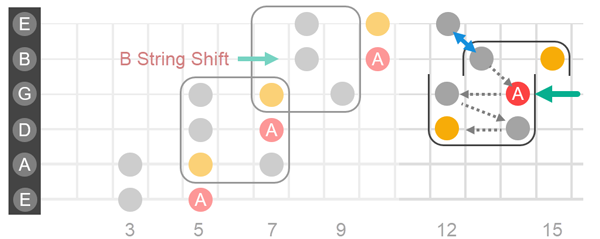
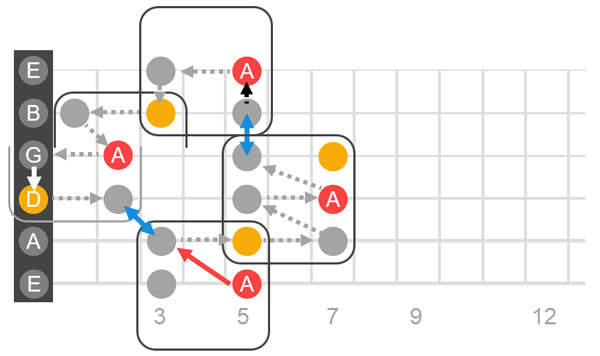
Starting from the 12th fret of the high E string, we can side-step to row 3 of a new square. Rows 1 and 2 of the new square shift back one fret because we're moving from the B string to the G string.
(Notation: E12, B13, B string shift, G14-12, D14-12)
The sequence above ends on the 12th fret of the D string. It's an orange corner note. We can't side step from that note, but we can move a narrow interval to the left or right and side-step from the gray corner note.
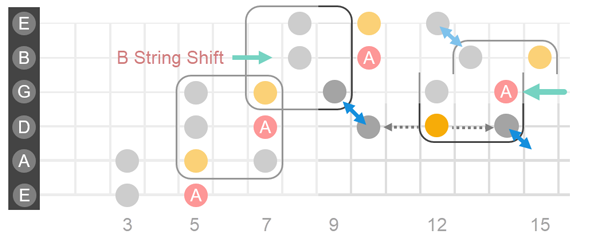
The orange note (D12) overlaps another square. You can play the notes in that square and eventually side-step your way back to the start.
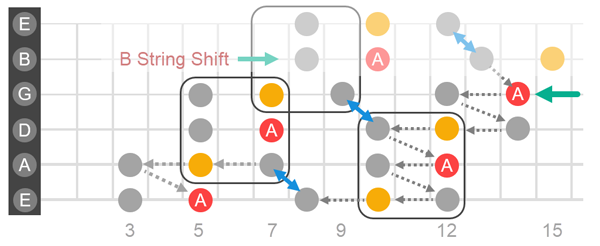
This next exercise demonstrates stepping squares, side-stepping, B string shifts, and the use of open strings. Notice that when you side-step from the G to the B string, the note on the B string is right below the one on the G string. That's the B string shift again.
(Notation: E5, A3-5-7, D5-7, G5, B shift, B5, E5-3, B3-1, B shift, G2-0, D0-2, A3-5, E3-E5)
Tablature (Tabs)
Here is the same sequence expressed in tabs. The numbers are the frets, the lines are the strings and zeros are open strings.
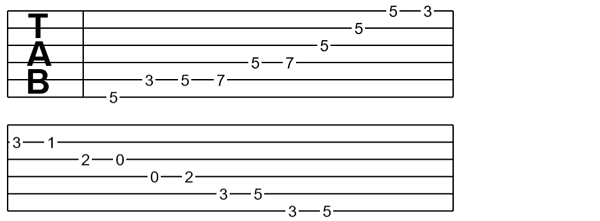
Here is the same sequence expressed in tabs. The numbers are the frets, the lines are the strings, and zeros are open strings. Tabs are easier to follow and less complicated than my illustrations. But they don't give you a picture of the underlying structure. So they're hard to remember. In a later section, I'll show you how to convert tabs to Freedom Block pictures.
 Milestone
You're now able to play every note in any minor pentatonic scale while moving over the entire fretboard. Side-stepping allows you to jump between groups of Stepping Squares and never run out of strings to play. In the next section, you'll learn how to use rectangles to jump between squares, but don't forget side-stepping. It's one more way to add variety to your soloing.
Here are some variations you can use to add more passion to your soloing:
- Slide from one note to another.
- Pause or change the duration of notes.
- Emphasize the root, which is the red note.
- Bend the string when playing a note.
- Play it both softly and loudly.
- Add the blues note (always next to an orange note).
- Play a note multiple times before continuing.
- Repeat a two- or three-note sequence multiple times.
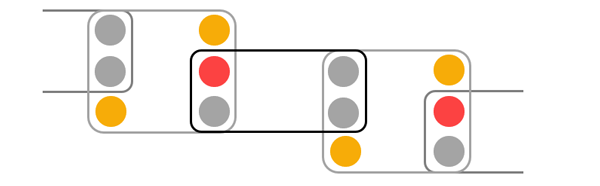
So far, we've relied on stepping squares and side-stepping to move around the fretboard. Right in the middle of the squares are rectangles. They provide a bridge between squares. They add variety. They contain the two notes that we removed from the natural minor scale to get our pentatonic scale.
More about rectangles in the next section. Right now, let's review what we've learned about Freedom Block squares.
Summary of Square Properties
"The only thing that makes one scale different from another is not the starting note, it's the separation of intervals." — Allan Holdsworth